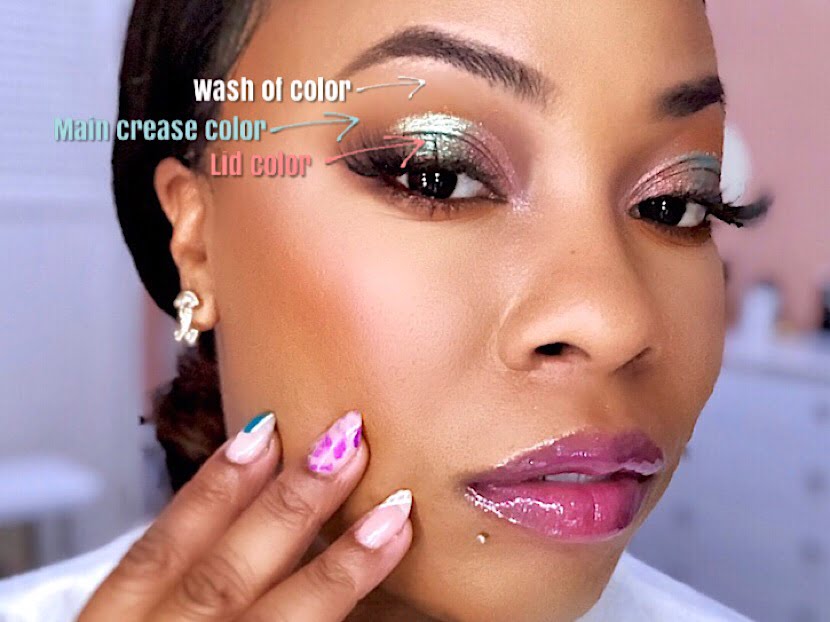
The key to a perfect smokey eye or any everyday eyeshadow look is blending. Since I often get asked about basic eyeshadow blending techniques I wanted to add an article to my blog for reference. These are some of my go-to steps to blend shadows. There are lots of techniques that I’ve gathered from practice but let’s start with a 101 session today.
Prime
Priming the lids do a number of things for shadow. It helps pigment last longer, helps to prevent creasing, and allows colors to be more vibrant just to name a few things. There are many ways to prime the lid but 2 simple ways are to use concealer or an eyeshadow primer. I normally use concealer because it is convenient to use since I already have the product out while I clean up my brows. Once I am done cleaning up my brows I blend a small amount of concealer down on my lids. After
Note: Sticky primer is great for glitter application but it can cause issues when trying to blend out powdery shadows.
Brushes
The right type of brush makes a difference in how eyeshadow applies as well as how it blends out on the lid. Brush types are personal as each person has their favorite way to apply shadows and even blend them. My favorite way is to place the shadow then lightly buff out the edges to prevent harsh lines. To do this I have my main go-to brushes.
Here are 5 brushes that will have you blending shadow like a pro. These brushes can be from any brand. The names and descriptions vary depending on the brand. When purchasing brushes pay more attention to the shape and bristles of a brush.
Fluffy Blending Brush: Creates a wash of color when blending. Deposits less color.
Crease Blending Brush: A brush that is more compact or dense but fluffier at the tip. Helps to blend shadows but also deposits color.
Short Flat Brush or Packing Brush: Dense brush that is best for depositing intense amount of color. They are very
Flat Synthetic Brush: Great for packing on metallic, shimmer, gloss, or glitter. Provides more intense payoff for shimmer and metallic shadows when applied wet.

Here are examples of the brushes mentioned above by the brand Stilazzi. From top to bottom: Fluffy Blending Brush, Crease Blending Brush, Packing Brush, Flat Synthetic Brush, Short Flat Brush.
Blending Steps
1. Prime the lid.
2. Use a Fluffy Blending Brush and apply a shade close to your skin tone in the crease.
To find your crease close your eyes and lightly place your finger on your eye socket right under the brow. Your transition shade should be placed there. For a simple
By applying a shade closer to your skin tone it helps the shadows you place on top to melt into your skin giving the appearance of no harsh lines.
When you place each color use light windshield wiper motions or small circles back and forth.
3. Choose the main crease color for your look (matte colors work best). Using a Crease Blending Brush apply the color right under the transition color and blend. Once you blend this color add more pigment on the brush and redo this step to intensify the color.
4. Choose your main lid color this can be any type of finish. For metallic, shimmer, or glitter shades use a Flat Synthetic Brush to apply. For matte shadows use a Short Flat Brush.
5. Apply your shade of choice all over the lid and slightly under the crease color. Then lightly blend out the edges with your Crease Blending Brush. No need to add additional product on the brush.
6. Now that all the shades are added to your lid double check if any areas need more blending. If so blend those areas.

For the lower lash line apply shadow of choice with a Flat Brush directly under your eyeliner. For more subtle looks leave out the eyeliner and add
Types of looks
There are so many looks you can create by changing the placement of shadows and blending colors in different areas of the eye. The blending steps listed above will assist you in achieving a basic eyeshadow look. Depending on the shape of your eyes there are other tricks to enhance. Check out its terreana YouTube channel for additional tips and tricks to get you blending and creating like a pro.
Thanks for hanging out!
XO Terreana


One thought on “Blending Eyeshadows 101 | Plus Brush Recommendations”